Intro
Trong bài này ta sẽ kiểm tra lại lý thuyết ta đã tìm hiểu tại chuỗi bài Account Abstraction với ERC-4337. Sử dụng Biconomy SDK.
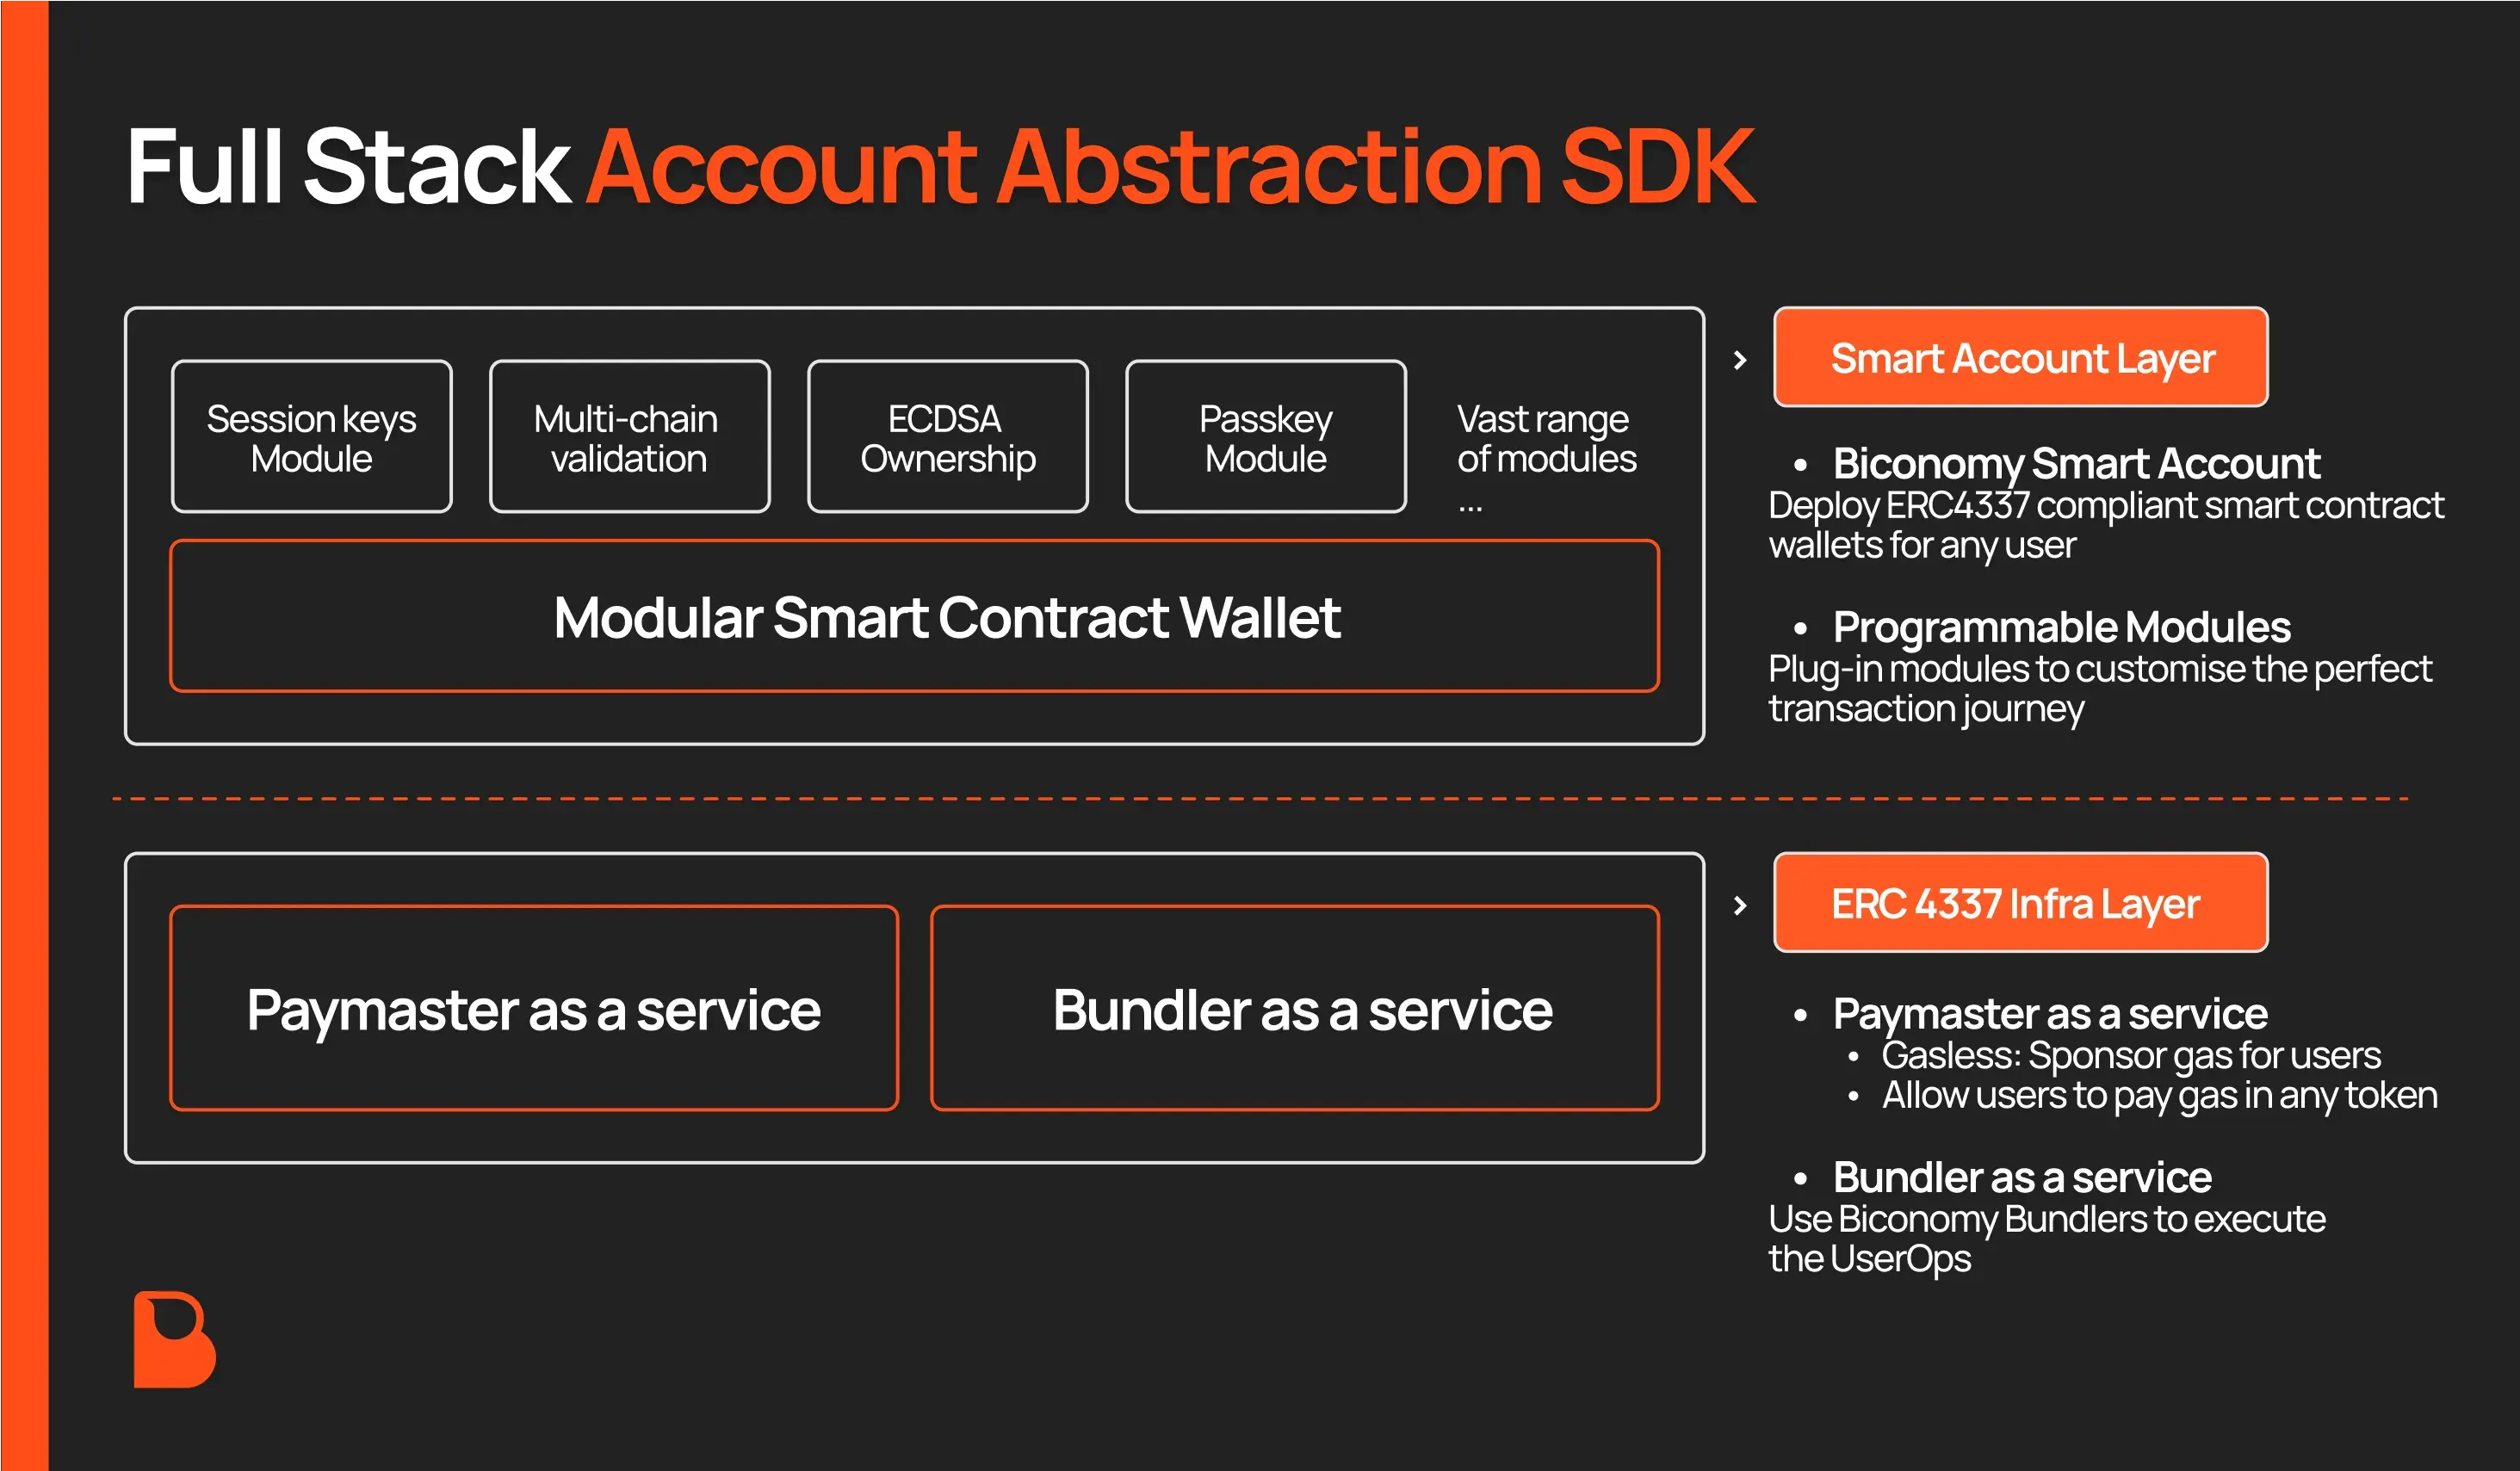
Biconomy SDK là một trong những bộ toolkit triển khai ERC-4337 hoàn thiện nhất hiện nay cho Account Abstraction.
Trong bài này ta sẽ sử dụng Polygon Mumbai testnet.
Ta sẽ kiểm tra các thứ sau:
- Cách tạo một Account.
Để ngắn gọn khi nhắc đến Account, ta ngầm hiểu nó chính là Biconomy Smart Account, hay Smart Contract Wallet, hay Wallet.
- Cách tạo ra một UserOperation cho việc gửi native token, tương tác với contract - ở đây là ERC-20 token transfer.
- Các kịch bản:
- Gửi native token (MATIC) từ Account sang địa chỉ khác, tự trả phí
- Gửi ERC-20 token từ Account sang địa chỉ khác, tự trả phí
- Gửi ERC-20 token từ Account sang địa chỉ khác, sử dụng paymaster trả phí hộ Account
- Gửi ERC-20 token từ Account sang địa chỉ khác, sử dụng paymaster trả phí hộ và cho phép Account trả lại phí bằng ERC-20 token (USDC).
- Kiểm tra các thông số của các giao dịch trên block explorer, đọc hiểu các thông số, xác định vai trò của
bundler,Entry Point,Account,Paymaster. - Đối chiếu các kết quả thu được, luồng thực thi, các thông số trên block explorer với lý thuyết.
Hands-on
Clone project quickstart của Biconomy về:
git clone [email protected]:bcnmy/quickstart.gitproject này lúc đầu chỉ có các dependencies chứ chưa có code gì cả, ta sẽ dần thêm code vào đây. Đầu tiên cứ cài đặt dependencies trước đã
yarn installTạo một .env file và paste private key vào đây. Đây sẽ là owner của Account của ta. Lưu ý rằng account này không cần phải có tiền. Nó chỉ đơn giản đóng vai trò là owner mà thôi.
PRIVATE_KEY = "enter some private key";Load dotenv config tại src/index.ts:
import { config } from "dotenv";

config();
Bây giờ là vào phần chính, ta tiếp tục import các thành phần khác từ biconomy SDK:
import { IBundler, Bundler } from "@biconomy/bundler";
import { DEFAULT_ENTRYPOINT_ADDRESS } from "@biconomy/account";
import { ethers } from "ethers";
import { ChainId } from "@biconomy/core-types";
Tạo config cho bundler:
const bundler: IBundler = new Bundler({
  bundlerUrl:
    "https://bundler.biconomy.io/api/v2/80001/nJPK7B3ru.dd7f7861-190d-41bd-af80-6877f74b8f44",
  chainId: ChainId.POLYGON_MUMBAI,
  entryPointAddress: DEFAULT_ENTRYPOINT_ADDRESS,
});
Ở đây ta sẽ dùng bundler và entryPointAddress mặc định của Biconomy.
Tiếp tục import thêm BiconomySmartAccountV2 vào, đây là class sẽ dùng để tạo ra Account của ta.
import {
  BiconomySmartAccountV2,
  DEFAULT_ENTRYPOINT_ADDRESS,
} from "@biconomy/account";
Tiếp theo load provider và owner wallet ra.
const provider = new ethers.providers.JsonRpcProvider(
  "https://rpc.ankr.com/polygon_mumbai"
);
const wallet = new ethers.Wallet(process.env.PRIVATE_KEY || "", provider);
Một điều nữa ta cần nắm được là module cho Account, trong bài này ta sẽ tạo account sử dụng ECDSA module.
import {
  ECDSAOwnershipValidationModule,
  DEFAULT_ECDSA_OWNERSHIP_MODULE,
} from "@biconomy/modules";
Tạo Account
Tiến hành tạo account:
async function createAccount() {
  const module = await ECDSAOwnershipValidationModule.create({
    signer: wallet,
    moduleAddress: DEFAULT_ECDSA_OWNERSHIP_MODULE,
  });

  let biconomySmartAccount = await BiconomySmartAccountV2.create({
    bundler,
    chainId: ChainId.POLYGON_MUMBAI,
    rpcUrl: "https://rpc.ankr.com/polygon_mumbai",
    entryPointAddress: DEFAULT_ENTRYPOINT_ADDRESS,
    defaultValidationModule: module,
    activeValidationModule: module,
  });

  console.log("address: ", await biconomySmartAccount.getAccountAddress());
  return biconomySmartAccount;
}
createAccount();
Chạy thử ta sẽ nhận được một địa chỉ giống thế này:
address: 0x76ae99af1c6493e22085613aec00e01f224b9534;Đây chính là địa chỉ Smart Account của ta. Tiếp theo ta sẽ test các kịch bản.
Ở các kịch bản ta có phần chung hầu như giống nhau là phần setup Account, bundler. Nên đối với mỗi kịch bản độc giả có thể viết script riêng để chạy, hoặc viết tất cả vào trong index.ts cũng được.
Test gửi native token (MATIC)
Ta sẽ test việc gửi native token từ Account qua một địa chỉ khác. Đầu tiên ta cần fund cho Account một ít MATIC để nó có thể đủ balance để gửi đi, và trả phí giao dịch.
Sau khi Account đã được fund, ta viết hàm chuyển 0.001 MATIC:
async function sendETH() {
  const smartAccount = await createAccount();
  try {
    const transaction = {
      to: "0xC3a005E15Cb35689380d9C1318e981BcA9339942",
      data: "0x",
      value: ethers.utils.parseEther("0.001"),
    };

    const userOp = await smartAccount.buildUserOp([transaction]);
    userOp.paymasterAndData = "0x";

    const userOpResponse = await smartAccount.sendUserOp(userOp);

    const transactionDetail = await userOpResponse.wait();

    console.log("transaction detail below");
    console.log(
      `https://mumbai.polygonscan.com/tx/${transactionDetail.receipt.transactionHash}`
    );
  } catch (error) {
    console.log(error);
  }
}

sendETH();
chạy script, kết quả trông như thế này:
address:  0x76Ae99AF1C6493E22085613AEc00e01f224b9534
transaction detail below
https://mumbai.polygonscan.com/tx/0xefcf4c0dcb97bb8407e6b6740295f85cddafee5f1a434a5b149b5fc49c7afe0a
thử kiểm tra trên explorer xem có đúng transaction chuyển đi 0.001 MATIC cho địa chỉ nhận hay không?

Đọc hiểu kết quả một chút:
From: người gửi ở đây chính làbundlerTo: là contract Entry Point, là một singleton contract trên toàn hệ thống- Ta có các sự kiện transfer như sau:
- Dòng đầu tiên
Walletsẽ transfer choEntry Point, đây là nạp tiền trước dùng để trả phí - Dòng tiếp theo là nội dung ta muốn thực hiện: chuyển 0.001 MATIC từ Account qua cho địa chỉ nhận
- Dòng cuối cùng
Entry Pointchuyển tiền lại chobundler, đây là lúc bundler được nhận lại phí giao dịch
- Dòng đầu tiên
Nó hoàn toàn khớp với lý thuyết mà ta đã nói đến trong chuỗi bài Account Abstraction với ERC-4337.
Test gửi ERC-20 token
Ta sẽ gửi ERC-20 token từ Account tới một địa chỉ nhận. Ở đây ta vẫn dùng Account cũ 0x76ae99af1c6493e22085613aec00e01f224b9534 đã có sẵn native token để trả phí.
Lên OpenZeppelin wizard để tạo một ERC-20 và deploy nó bằng REMIX, đồng thời gửi cho Account của ta một ít token:
// SPDX-License-Identifier: MIT
pragma solidity ^0.8.20;

import "@openzeppelin/[email protected]/token/ERC20/ERC20.sol";

contract BICOTKN is ERC20 {
    constructor() ERC20("BICOTKN", "BICOTKN") {
        _mint(0x76Ae99AF1C6493E22085613AEc00e01f224b9534, 1000 * 10 ** decimals());
    }
}
Tiến hành deploy, lưu địa chỉ token contract đã deploy lại: 0xD798956327E1648ECBe76478B023188F25eB75B8
Đồng thời lưu abi của contract tại src/BICOTKN.json.
Tiến hành import token contract abi:
import abi from "./BICOTKN.json";Các bước tạo account ta giữ như cũ, địa chỉ Account cũng là địa chỉ cũ 0x76ae99af1c6493e22085613aec00e01f224b9534.
Viết hàm sendToken gửi thử 12 BICOTKN:
async function sendToken() {
  const smartAccount = await createAccount();
  const receiver = "0xC3a005E15Cb35689380d9C1318e981BcA9339942";
  const tokenAddress = "0xD798956327E1648ECBe76478B023188F25eB75B8";
  const amount = "12000000000000000000"; // 12 tokens

  try {
    const bicoTokenInterface = new ethers.utils.Interface(abi);
    const data = bicoTokenInterface.encodeFunctionData("transfer", [
      receiver,
      amount,
    ]);
    const transaction = { to: tokenAddress, data };

    const userOp = await smartAccount.buildUserOp([transaction]);
    userOp.paymasterAndData = "0x";

    const userOpResponse = await smartAccount.sendUserOp(userOp);

    const transactionDetail = await userOpResponse.wait();

    console.log("transaction detail below");
    console.log(
      `https://mumbai.polygonscan.com/tx/${transactionDetail.receipt.transactionHash}`
    );
  } catch (error) {
    console.log(error);
  }
}

sendToken();
chạy hàm và kết quả:
address:  0x76Ae99AF1C6493E22085613AEc00e01f224b9534
transaction detail below
https://mumbai.polygonscan.com/tx/0x69e30218b4bdd1ead85024cc056f3d486ff7a0b53c95d6ac04087e984798e052
thử kiểm tra trên explorer xem có đúng transaction chuyển đi 12 token BICOTKN và Account còn lại 988 token hay không?

Về các thông số thì ta đọc tương tự như ở phần gửi native token bên trên.
Test paymaster
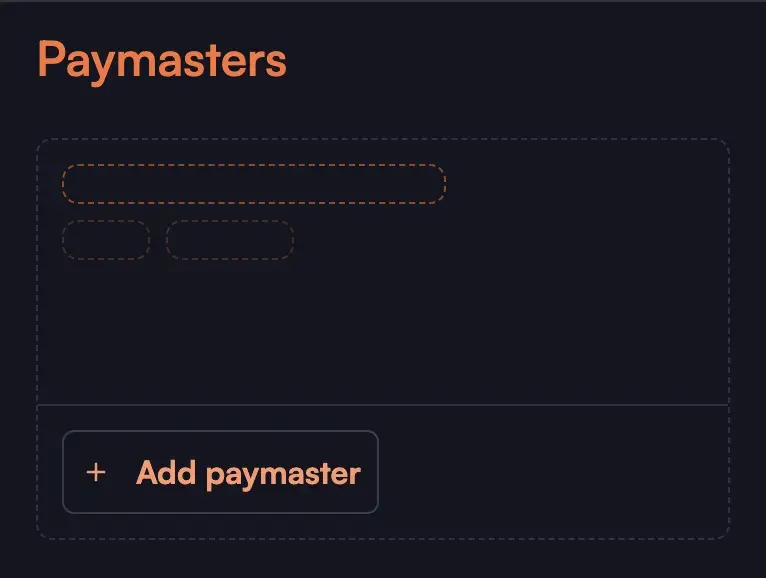
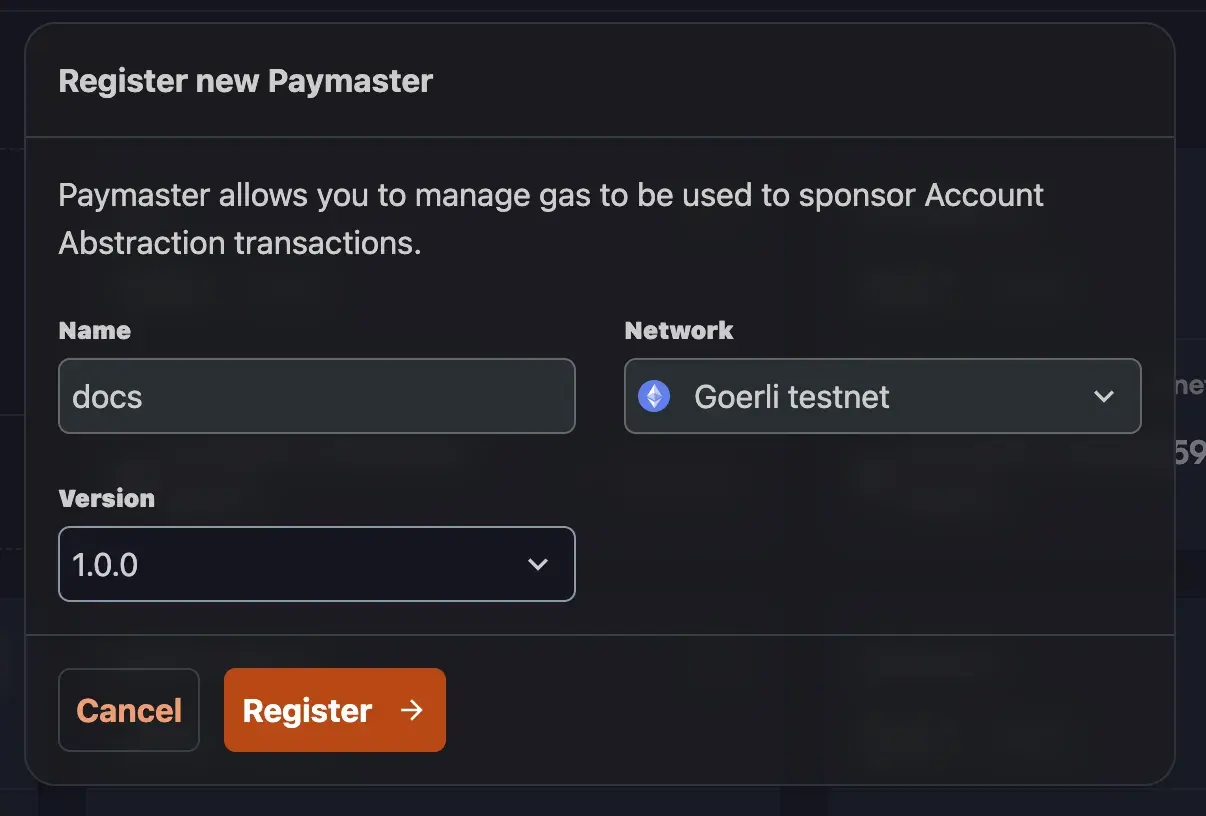
Setup Paymaster
Trong bài này ta sẽ sử dụng Polygon Mumbai testnet.
Ta sẽ setup paymaster theo hướng dẫn ở đây: https://docs.biconomy.io/dashboard/paymaster
- Tại Dashboard tiến hành
Add Paymaster
- Tiếp tục register paymaster, chọn tên, version và network, chú ý trong bài này ta dùng Polygon Mumbai Testnet
- Tạo Gas Tank cho paymaster để sử dụng cho việc trả phí gas thay cho user
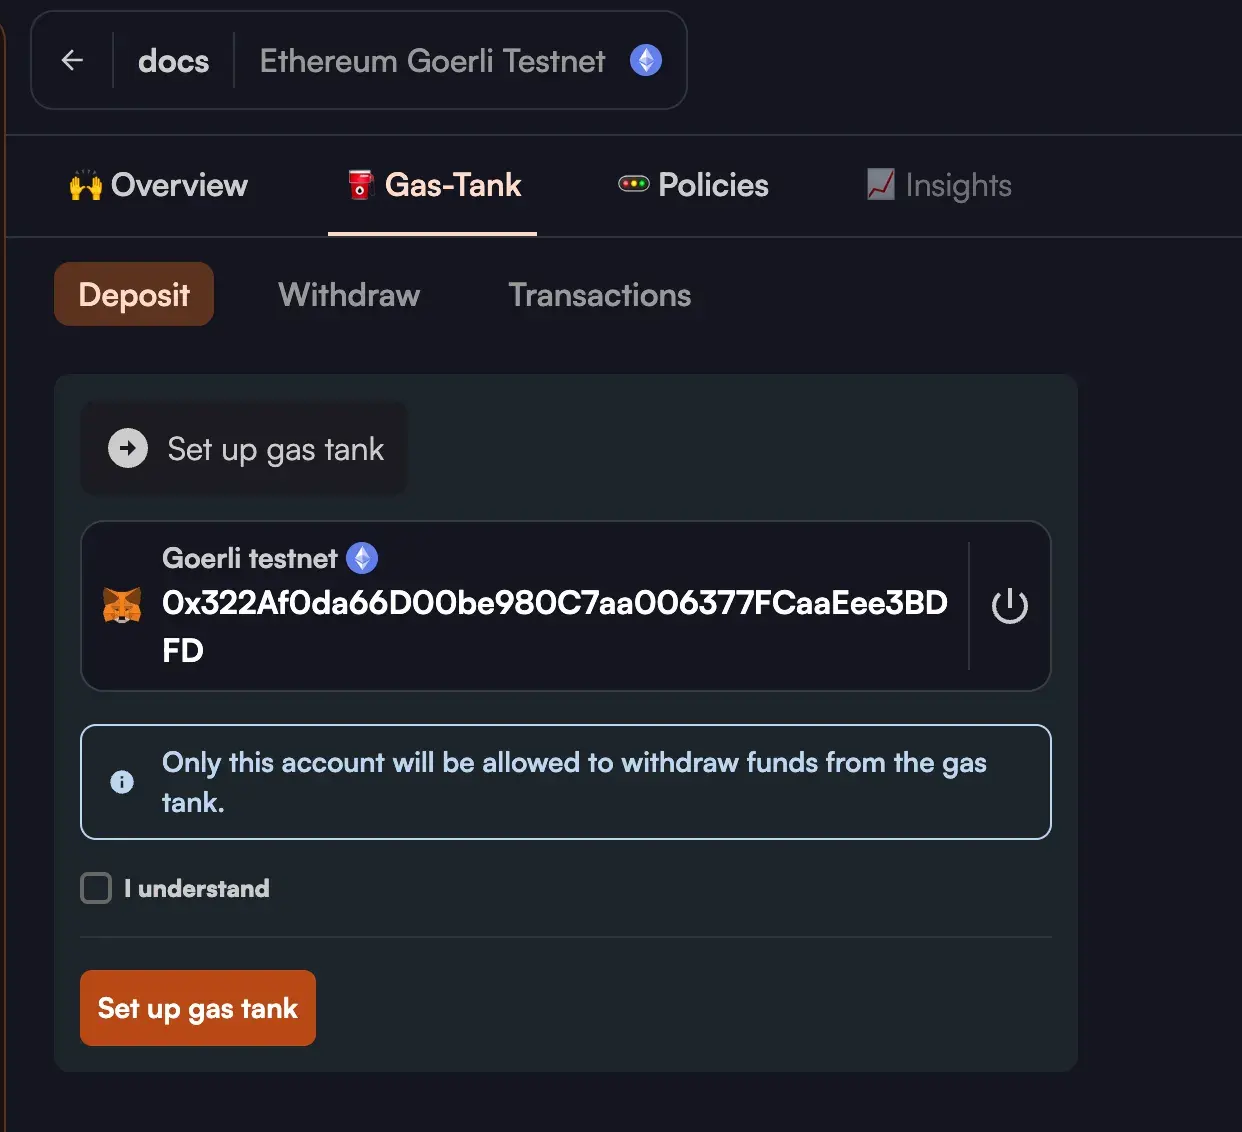
- Tiếp theo tiến hành Deposit funds vào gas tank
đằng sau việc này là gọi hàm depositFor(address) của VerifySingletonPaymaster để gửi ETH vào EntryPoint.
- ta cũng có thể rút ra bất cứ lúc nào bằng Withdraw funds
tương tự trên, action này gọi withdrawTo(address, uint256) từ VerifySingletonPaymaster.
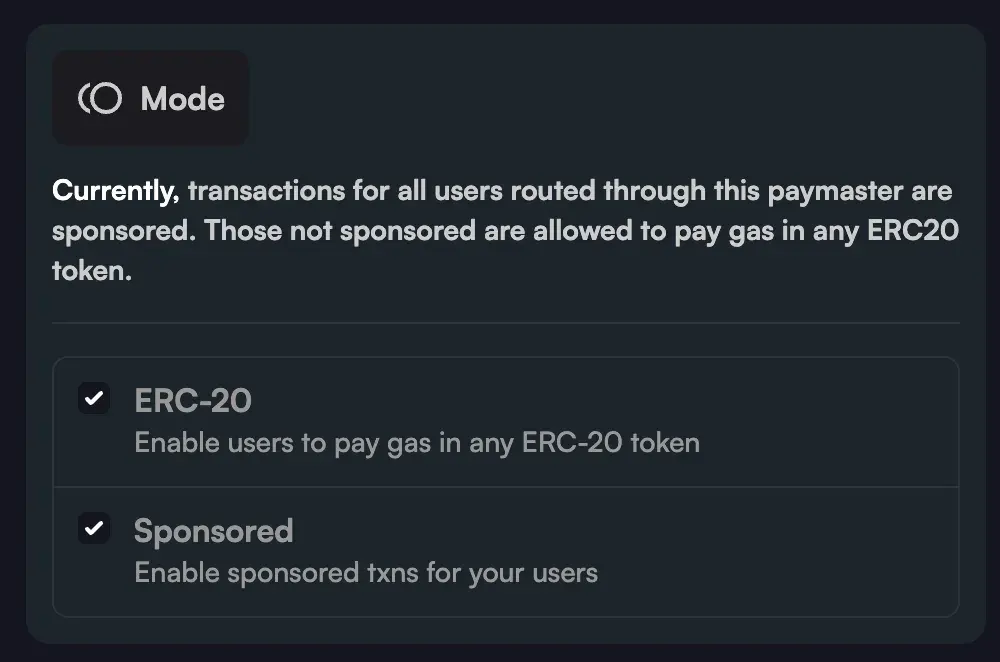
Trong overview ta sẽ thấy ở phần Mode có 2 tick là ERC-20 và Sponsored, tức là ta có thể sử dụng paymaster để trả phí hộ user, và cũng có thể chấp nhận việc user trả phí bằng ERC-20 token thay vì ETH. Chỉ có một số lượng nhất định ERC-20 được chấp nhận ở đây, hầu hết là các token nổi tiếng và có thanh khoản dồi dào.
Test gas sponsoring với paymaster: chuyển BICOTKN token
Ta sẽ chuyển BICOTKN từ một Account mới toanh tới địa chỉ nhận mà không cần Account phải hold chút native token nào.
Để test phần này, ta dùng PRIVATE_KEY2 mới trong .env để tạo ra một Account mới toanh, đồng thời thêm vào địa chỉ paymaster mà ta đã setup bên trên.
PRIVATE_KEY2 = "new private key";
PAYMASTER_URL = "pay master url";
Các bước tạo account ta làm như cũ.
Ta nhận được Account mới với địa chỉ: 0x2283bccbA5ed74e50F2382fF8eb60Eb8d6a1D78e.
Hiện giờ Account mới chưa có một token nào, cũng không có native token (MATIC), ta cần gửi cho nó một ít BICOTKN. Đơn giản là ta chạy lại hàm gửi ERC-20 token ở bên trên với địa chỉ nhận là Account mới của ta.
Giờ đây Account mới có 12 BICOTKN.
Tiến hành import các class cần thiết để tạo paymaster:
import {
  IPaymaster,
  IHybridPaymaster,
  SponsorUserOperationDto,
  BiconomyPaymaster,
  PaymasterConfig,
  PaymasterMode,
} from "@biconomy/paymaster";
tạo paymaster
const paymasterConfig: PaymasterConfig = {
  paymasterUrl: process.env.PAYMASTER_URL!,
};

const paymaster: IPaymaster = new BiconomyPaymaster(paymasterConfig);
thêm paymaster vào lúc khởi tạo smart account:
let biconomySmartAccount = await BiconomySmartAccountV2.create({
  bundler,
  chainId: ChainId.POLYGON_MUMBAI,
  rpcUrl: "https://rpc.ankr.com/polygon_mumbai",
  entryPointAddress: DEFAULT_ENTRYPOINT_ADDRESS,
  defaultValidationModule: module,
  activeValidationModule: module,
  paymaster,
});
Viết hàm sendTokenPaymaster:
async function sendTokenPaymaster() {
  const smartAccount = await createAccount();
  const receiver = "0xC3a005E15Cb35689380d9C1318e981BcA9339942";
  const tokenAddress = "0xD798956327E1648ECBe76478B023188F25eB75B8";
  const amount = "2000000000000000000"; // 2 tokens

  try {
    const bicoTokenInterface = new ethers.utils.Interface(abi);
    const data = bicoTokenInterface.encodeFunctionData("transfer", [
      receiver,
      amount,
    ]);
    const transaction = { to: tokenAddress, data };

    const userOp = await smartAccount.buildUserOp([transaction]);
    const bicoPaymaster =
      smartAccount.paymaster as IHybridPaymaster<SponsorUserOperationDto>;
    let paymasterServiceData: SponsorUserOperationDto = {
      mode: PaymasterMode.SPONSORED,
      smartAccountInfo: {
        name: "BICONOMY",
        version: "2.0.0",
      },
    };
    const paymasterAndDataResponse = await bicoPaymaster.getPaymasterAndData(
      userOp,
      paymasterServiceData
    );

    userOp.paymasterAndData = paymasterAndDataResponse.paymasterAndData;
    userOp.callGasLimit = paymasterAndDataResponse.callGasLimit;
    userOp.verificationGasLimit = paymasterAndDataResponse.verificationGasLimit;
    userOp.preVerificationGas = paymasterAndDataResponse.preVerificationGas;

    const userOpResponse = await smartAccount.sendUserOp(userOp);

    const transactionDetail = await userOpResponse.wait();

    console.log("transaction detail below");
    console.log(
      `https://mumbai.polygonscan.com/tx/${transactionDetail.receipt.transactionHash}`
    );
  } catch (error) {
    console.log(error);
  }
}

sendTokenPaymaster();
chạy script được kết quả:
address:  0x2283bccbA5ed74e50F2382fF8eb60Eb8d6a1D78e
transaction detail below
https://mumbai.polygonscan.com/tx/0xcf80979bf5c8ee2c80178e0c77cf8135bce2136fe3bf45eb63fb6fd94cb9a237
thử kiểm tra trên explorer xem có đúng transaction chuyển đi 2 BICOTKN hay không?
Đọc hiểu sơ bộ các thông số tương tự như trước:
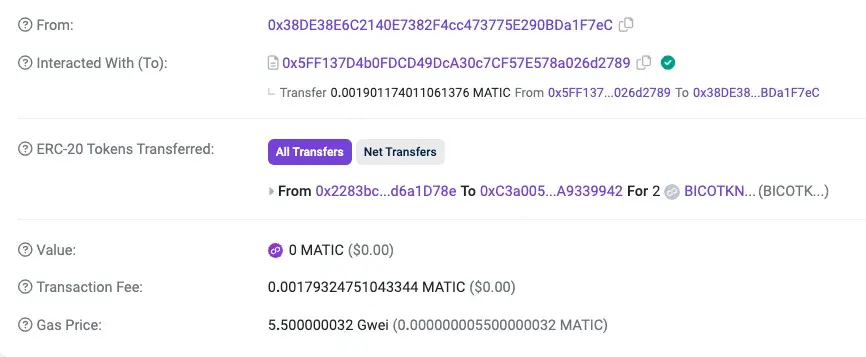
From: bundlerTo: Entry Point- Các sự kiện transfer:
- Gửi 0.00019 MATIC là phí giao dịch từ Entry Point đến bundler
- gửi 2 BICOTKN từ Account mới của ta đến địa chỉ nhận
Ta thấy rằng rõ ràng Account mới của ta không hề có native token, nhưng vẫn hoàn thành được giao dịch, đó là nhờ có paymaster.
Nhưng ở đây ta có thể thắc mắc là tại sao lại là Entry Point trả phí giao dịch chứ không phải là Paymaster? Lý do chính là ở bước setup Paymaster bên trên, ta đã tiến hành deposit từ Paymaster vào trong Entry Point rồi. Từ đó Entry Point sẽ sử dụng phần deposit này để đại diện Paymaster trả phí, khi lượng deposit này không đủ thì sẽ yêu cầu Paymaster deposit thêm vào.
Điều này cũng vẫn hoàn toàn khớp với lý thuyết ta đã tìm hiểu. Cool.
Test trả phí bằng non-native token với paymaster: chuyển BICOTKN token, trả phí bằng ERC-20 Token
Vẫn là ví mới ta vừa tạo, không có native token. Ta sẽ test việc gửi đi BICOTKN như cũ, nhưng sẽ trả phí bằng ERC-20 thay vì MATIC như trước.
Không phải mọi ERC-20 đều được chấp nhận dùng làm token trả phí, sẽ chỉ có một vài token được support mà thôi, chủ yếu là các token có dồi dào thanh khoản.
Để biết token nào được support, trước hết tiến hành import thêm PaymasterFeeQuote
import { PaymasterFeeQuote } from "@biconomy/paymaster";sau đó chạy đoạn code này:
const feeQuotesResponse = await bicoPaymaster.getPaymasterFeeQuotesOrData(
  userOp,
  {
    mode: PaymasterMode.ERC20,
    tokenList: [],
  }
);
const feeQuotes = feeQuotesResponse.feeQuotes as PaymasterFeeQuote[];
console.log(feeQuotes);
Với Polygon Mumbai testnet, thì các token được support sẽ như sau:
[
  {
    symbol: "WMATIC",
    decimal: 18,
    tokenAddress: "0x9c3c9283d3e44854697cd22d3faa240cfb032889",
    maxGasFee: 0.0006582146580199368,
    maxGasFeeUSD: 0.0005551777354534959,
    exchangeRate: 1003331515424560800,
    logoUrl: "https://polygonscan.com/token/images/wMatic_32.png",
    premiumPercentage: "12",
    validUntil: 1699542938,
  },
  {
    symbol: "USDT",
    decimal: 18,
    tokenAddress: "0xeabc4b91d9375796aa4f69cc764a4ab509080a58",
    maxGasFee: 0.0005300908633286532,
    maxGasFeeUSD: 0.0005303930151207506,
    exchangeRate: 845787900896489100,
    logoUrl:
      "https://raw.githubusercontent.com/spothq/cryptocurrency-icons/master/128/color/usdt.png",
    premiumPercentage: "7",
    validUntil: 1699542938,
  },
  {
    symbol: "USDC",
    decimal: 6,
    tokenAddress: "0xda5289fcaaf71d52a80a254da614a192b693e977",
    maxGasFee: 0.0005305471936710001,
    maxGasFeeUSD: 0.0005303933349848354,
    exchangeRate: 846516,
    logoUrl:
      "https://raw.githubusercontent.com/spothq/cryptocurrency-icons/master/128/color/usdc.png",
    premiumPercentage: "7",
    validUntil: 1699542938,
  },
  {
    symbol: "DAI",
    decimal: 18,
    tokenAddress: "0x27a44456bedb94dbd59d0f0a14fe977c777fc5c3",
    maxGasFee: 0.0005300378897346283,
    maxGasFeeUSD: 0.0005303930151207506,
    exchangeRate: 845703378736246800,
    logoUrl:
      "https://raw.githubusercontent.com/spothq/cryptocurrency-icons/master/128/color/dai.png",
    premiumPercentage: "7",
    validUntil: 1699542938,
  },
  {
    symbol: "SAND",
    decimal: 18,
    tokenAddress: "0xe03489d4e90b22c59c5e23d45dfd59fc0db8a025",
    maxGasFee: 0.0013380033631058149,
    maxGasFeeUSD: 0.0005551777354534958,
    exchangeRate: 2039548839563299800,
    logoUrl:
      "https://raw.githubusercontent.com/spothq/cryptocurrency-icons/master/128/color/sand.png",
    premiumPercentage: "12",
    validUntil: 1699542938,
  },
];
Ta sẽ chọn USDC (0xda5289fcaaf71d52a80a254da614a192b693e977) để trả phí.
Trước tiên ta phải kiếm cách fund cho Account một ít USDC để trả phí.
Các đơn giản nhất là dùng một EOA thông thường có MATIC, lên Uniswap swap lấy USDC và chuyển cho Account mới của ta.
OK, giờ đây Account của ta đã có USDC đủ để trả phí giao dịch.
Ta sẽ viết hàm sendTokenPayMasterERC20 như sau:
async function sendTokenPaymasterERC20() {
  const smartAccount = await createAccount();
  const receiver = "0xC3a005E15Cb35689380d9C1318e981BcA9339942";
  const tokenAddress = "0xD798956327E1648ECBe76478B023188F25eB75B8";
  const amount = "2000000000000000000";

  try {
    const bicoTokenInterface = new ethers.utils.Interface(abi);
    const data = bicoTokenInterface.encodeFunctionData("transfer", [
      receiver,
      amount,
    ]);
    const transaction = { to: tokenAddress, data };

    let userOp = await smartAccount.buildUserOp([transaction]);

    const bicoPaymaster =
      smartAccount.paymaster as IHybridPaymaster<SponsorUserOperationDto>;

    const feeQuotesResponse = await bicoPaymaster.getPaymasterFeeQuotesOrData(
      userOp,
      {
        mode: PaymasterMode.ERC20,
        tokenList: ["0xda5289fcaaf71d52a80a254da614a192b693e977"],
      }
    );

    const feeQuotes = feeQuotesResponse.feeQuotes as PaymasterFeeQuote[];
    const spender = feeQuotesResponse.tokenPaymasterAddress || "";
    const usdcFeeQuotes = feeQuotes[0];

    userOp = await smartAccount.buildTokenPaymasterUserOp(userOp, {
      feeQuote: usdcFeeQuotes,
      spender: spender,
      maxApproval: false,
    });

    let paymasterServiceData: SponsorUserOperationDto = {
      mode: PaymasterMode.ERC20,
      feeTokenAddress: usdcFeeQuotes.tokenAddress,
      smartAccountInfo: {
        name: "BICONOMY",
        version: "2.0.0",
      },
    };

    const paymasterAndDataWithLimits = await bicoPaymaster.getPaymasterAndData(
      userOp,
      paymasterServiceData
    );
    userOp.paymasterAndData = paymasterAndDataWithLimits.paymasterAndData;
    userOp.callGasLimit = paymasterAndDataWithLimits.callGasLimit;
    userOp.verificationGasLimit = paymasterAndDataWithLimits.verificationGasLimit;
    userOp.preVerificationGas = paymasterAndDataWithLimits.preVerificationGas;

    const userOpResponse = await smartAccount.sendUserOp(userOp);

    const transactionDetail = await userOpResponse.wait();

    console.log("transaction detail below");
    console.log(
      `https://mumbai.polygonscan.com/tx/${transactionDetail.receipt.transactionHash}`
    );
  } catch (error) {
    console.log(error);
  }
}

sendTokenPaymasterERC20();
chạy script được kết quả:
address:  0x2283bccbA5ed74e50F2382fF8eb60Eb8d6a1D78e
transaction detail below
https://mumbai.polygonscan.com/tx/0x7c43386615f302d5606c05f9f799a34e8afbb52056e17876d0c1e3ab05ab3ff0
Thử kiểm tra trên explorer:
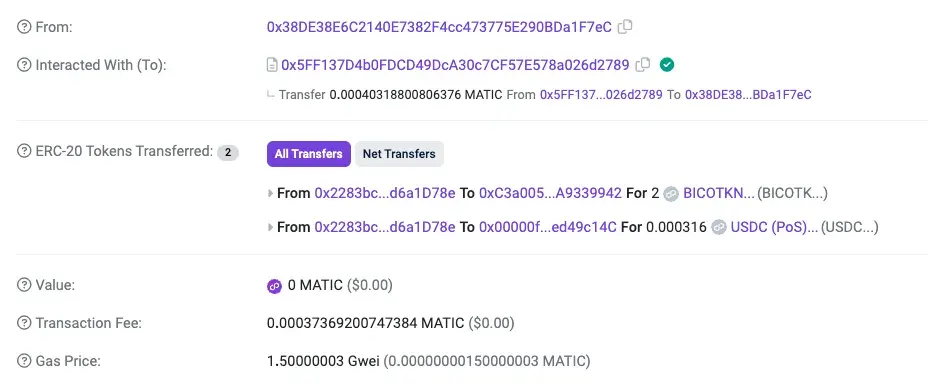
Đọc hiểu sơ bộ kết quả:
From: bundlerTo: Entry Point- Các sự kiện transfer:
- Gửi 0.00019 MATIC là phí giao dịch từ Entry Point đến bundler (tương tự lúc trước)
- gửi 2 BICOTKN từ Account của ta đến địa chỉ nhận
- gửi 0.000316 USDC từ Account của ta đến Paymaster.
Như vậy ta đã tiến hành trả phí giao dịch bằng USDC thành công. Quá trình này diễn ra hầu như giống với giao dịch gas sponsoring bên trên, khi paymaster trả hộ phí giao dịch. Chỉ khác là ở đây ta sẽ phải trả lại phí cho paymaster bằng USDC, với rate đã được tính toán tại thời điểm giao dịch. Lưu ý rằng ở đây không nảy sinh giao dịch swap để convert lại USDC về MATIC (điều này rõ ràng tốn phí), mà chỉ đơn thuần Paymaster nhận về USDC với giá trị tương đương phí giao dịch mà thôi.
Và mọi thứ vẫn hoạt động đúng như lý thuyết ta đã tìm hiểu. So cool.
Bạn đọc có thể tham khảo code tại đây: https://github.com/dotrungkien/aa-biconomy